本文主要记录 Hexo 的优化历程,以备后面翻阅。
添加 emoji 支持
由于 Hexo 的 Markdown 语法并不支持 emoji 表情,所以只能通过第三方插件来实现此功能
安装
1
2
npm i hexo-renderer-markdown-it --save npm install markdown-it-emoji --save
配置
编辑站点文件
1
2
3
4
5
6
7
markdown: plugins: - markdown-it-footnote - markdown-it-sup - markdown-it-sub - markdown-it-abbr - markdown-it-emoji
支持 Gitter 聊天室
新建 gitter.swig 文件
在~/主题 /layout 文件夹下创建,添加如下内容
1
2
3
4
5
6
7
8
{% if theme.gitter.enable %} <script> ((window .gitter = {}).chat = {}).options = { room: 'Newdee/newdee' }; </script> <script src="https:/ /sidecar.gitter.im/ dist/sidecar.v1.js" async defer></script> {% endif %}
配置
设置样式
在~/themes/next/source/css_custom/custom.sty 设置打开聊天室 Button 样式
1
2
3
4
5
6
7
8
9
10
11
.gitter-open-chat-button { right : 20px ; padding : 10px ; background-color : #777 ; } @media (max-width: 600px ) { .gitter-open-chat-button , .gitter-chat-embed { display : none; } }
添加 Gitter 到主题中
添加到 body div 前面
1 {% include './gitter.swig' %}
在主题配置文件开启 gitter
支持字数统计
wordcount 支持字数统计、阅读时长
安装插件
1 npm install hexo-wordcount --save
开启插件
在主题配置文件修改
1 2 3 4 post_wordcount: item_text: true wordcount: true min2read: true
统计阅读次数
集成 leancloud
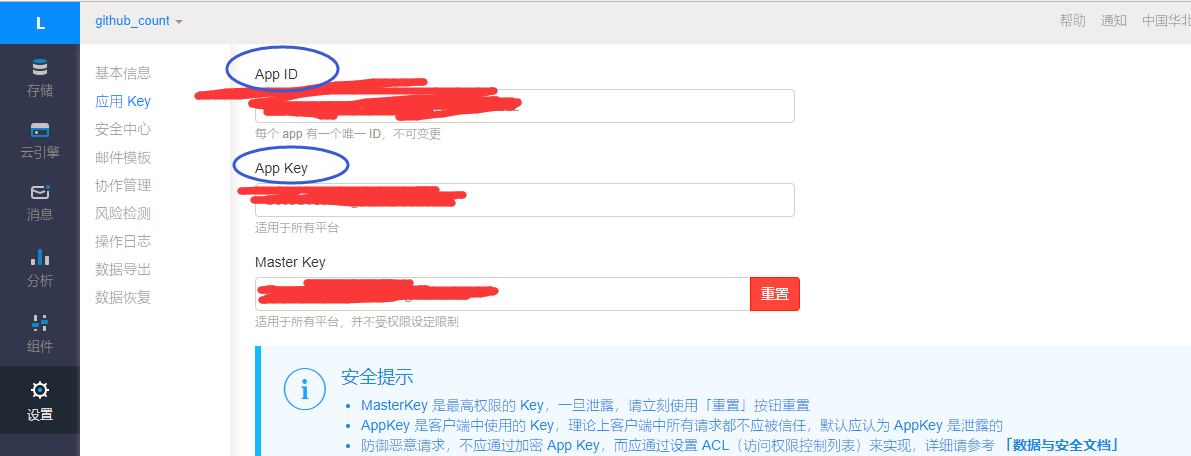
获取 app_key 和 app_id
在 leancloud 注册帐号,之后新建一个应用,在此应用里可以找到 app_key 和 app_id
新建 Class
在新建的应用中创建一个 Class,名称必须是 Counter,其余默认即可
配置
把 app_key 和 app_id 填充到主题配置文件中如下位置
1 2 3 4 leancloud_visitors: enable: true app_id: yourapp_id app_key: yourapp_key
添加版权声明
添加声明信息
在~\themes\next\layout_macro\post.swig 合适位置添加如下内容,我是放在
1 2 3 4 5 6 7 8 9 10 11 12 13 14 15 16 17 18 19 20 21 22 23 24 25 26 27 28 29 30 {# 版权声明节点 #} <div> {% if not is_index %} <ul class "post-copyright" > <li class "post-copyright-link" > <strong>本文作者:</strong> <a href="/ " title=" 欢迎访问 {{ theme.author }} 的个人博客">{{ theme.author }}</a> </li> <li class=" post-copyright-link"> <strong>本文标题:</strong> <a href=" {{ url_for(post.permalink) }}" title=" {{ post.title }}">{{ post.title }}</a> </li> <li class=" post-copyright-link"> <strong>本文链接:</strong> <a href=" {{ url_for(post.permalink) }}" title=" {{ post.title }}">{{ post.permalink }}</a> </li> <li class=" post-copyright-date"> <strong>发布时间:</strong>{{ post.date.format(" YYYY 年 M 月 D 日 - HH 时 MM 分") }} </li> <li class=" post-copyright-license"> <strong>版权声明: </strong> 本文由采用 <a href=" https: </li> </u l> {% endif %} </div>
设置声明样式
在~/themes/next/source/css_custom/custom.styl 添加样式
1
2
3
4
5
6
7
.post-copyright { margin : 2em 0 0 ; padding : 0.5em 1em ; border-left : 3px solid #FF1700 ; background-color : #F9F9F9 ; list-style : none; }
显示文章更新日期
因为我用的是 Next 主题,所以操作非常简单,只需修改主题配置文件即可
1
2
3
4
5
post_meta: item_text: true created_at: true updated_at: true categories: true
支持文章置顶
下载插件
1
2
npm uninstall hexo-generator-index --save npm install hexo-generator-index-pin-top --save
添加置顶标签
打开~/themes/next/layout/_macro/post.swig,在<div class=“post-meta”>添加如下代码
1
2
3
4
5
6
7
{% if post.top %} <span class "post-meta-item-icon" > <i class "fa fa-thumb-tack" ></i> </span> <font color=7D26CD>置顶</ font> <span class "post-meta-divider" >|</span> {% endif %}
添加标记
在需要置顶的文章的 Front-matter 中加上 top: true 即可,
比如:
1
2
3
4
title: 打造个人阅读追踪系统 date: 2018 -01 -13 21 :03:34 categories: "生产力" top: true
支持文章分享
修改过气 API
这是目前找到的唯一支持 https 的分享插件,但是分享到微信的 api 有改动,所以需要修改~\themes\next\source\lib\needsharebutton\needsharebutton.js 如下位置
1 2 3 4 var imgSrc = "https://pan.baidu.com/share/qrcode?w=400&h=400&url=" + encodeURIComponent (myoptions.url);
启用分享
因为 next 主题已经集成 needsharebutton 插件,所以只需要开启即可
1
2
3
4
5
6
7
8
9
10
11
12
13
14
15
16
needmoreshare2: enable: true postbottom: enable: true options: iconStyle: box boxForm: horizontal position: bottomCenter networks: Weibo,Wechat,Douban,QQZone,Twitter,Facebook float: enable: true options: iconStyle: box boxForm: horizontal position: bottomRight networks: Weibo,Wechat,Douban,QQZone,Twitter,Facebook
安装插件
1 npm install hexo-generator-feed --save
配置
打开站点配置文件,添加如下内容
1
2
3
4
5
6
7
feed: type: atom //订阅协议(atom/ass2) path: atom.xml //路径 limit: 20 //一次包含文章数量限制 hub: //用不着不管 content: //订阅文件是否包含整个文章("true"为是,留空为否) content_limit: 140 //content 为否时,包含的文章概要字数
智能显示更新时间
如果没有设置updated 关键字,Hexo 默认取最近一次 generate 的时间作为更新时间,通常我们的文章不太可能一次性写完,所以真正发布后的更新才需要显示更新时间,这里修改为一天内写完的文章再次修改,不会显示更新时间
打开~\themes\next\layout_macro\post.swig 文件,参考如下修改,可以搜索updated_at ,只修改了两处
1
2
3
4
5
6
7
8
9
10
11
12
13
14
15
16
{% if theme.post_meta.created_at and theme.post_meta.updated_at and post.updated-post.date>24 *3600 *1000 %} <span class "post-meta-divider" >|</span> {% endif %} {% if theme.post_meta.updated_at and post.updated-post.date>24 *3600 *1000 %} <span class "post-meta-item-icon" > <i class "fa fa-calendar-check-o" ></i> </span> {% if theme.post_meta.item_text %} <span class="post-meta-item-text">{{ __('post.modified') }}:</ span> {% endif %} <time title="{{ __('post.modified') }}" itemprop="dateModified" datetime="{{ moment(post.updated).format() }}" > {{ date(post.updated, config.date_format) }} </time> {% endif %}
支持站点地图
Google
安装插件
1 npm install hexo-generator-sitemap --save
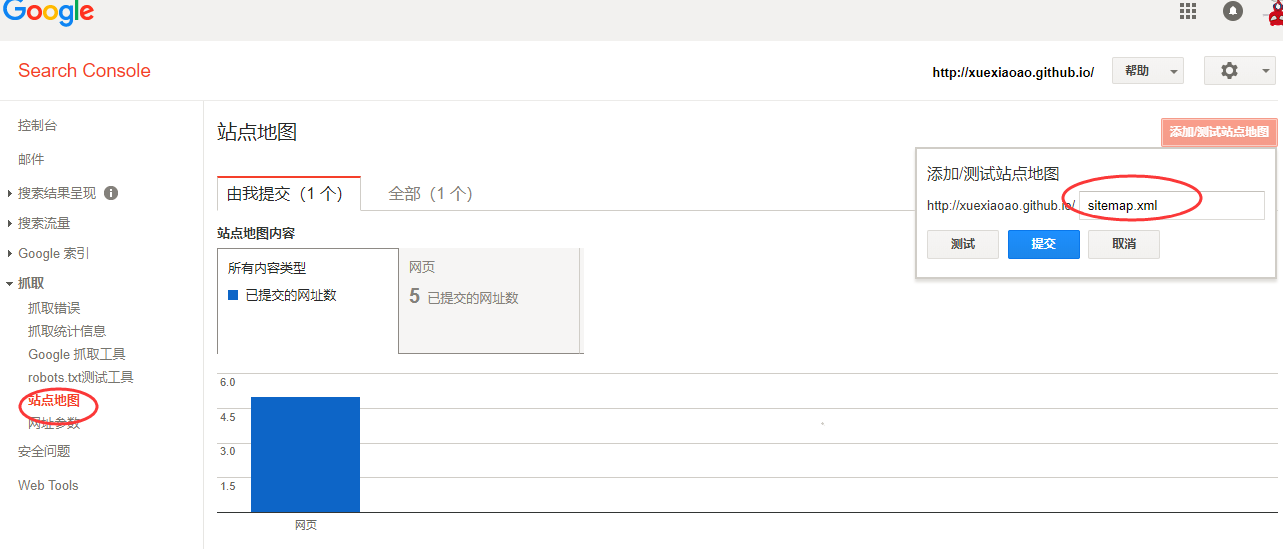
配置
在站点配置文件下,添加如下内容
1 2 3 sitemap: path: sitemap.xml
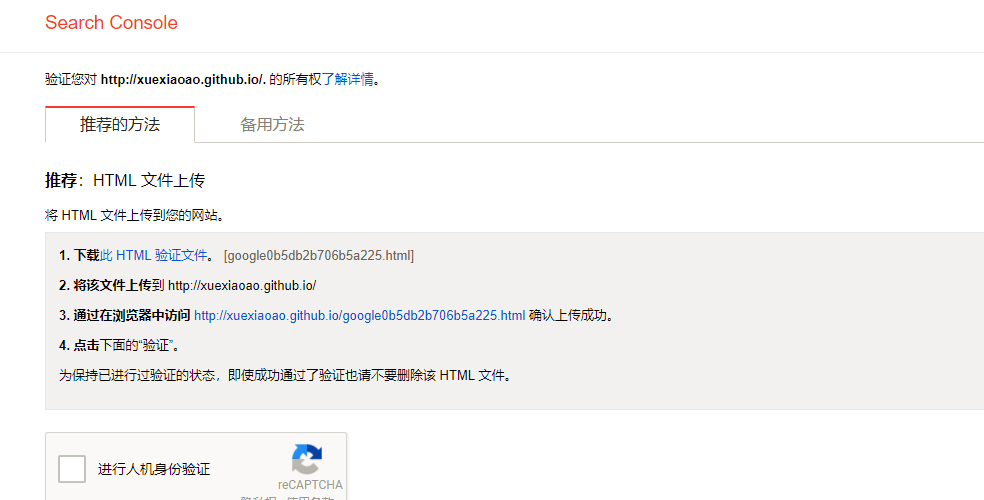
验证网站
根据 Google 提示,下载验证文件放到 Source 文件夹,上传到网站,这里需要注意的是放到 Source 文件夹的任何文件默认是会被 hexo 处理的,这样会导致验证失败,下一步给出解决方案
跳过编译验证文件
只需要在站点配置文件指定即可,这里的文件路径是相对于 Source
添加 rebots.txt
在~\source 下新建 rebots.txt,内容可参考下面
1
2
3
4
5
6
7
8
9
10
11
12
13
14
User-agent: * Allow: / Allow: /archives/ Allow: /categories/ Allow: /about/ Disallow: /vendors/ Disallow: /js/ Disallow: /css/ Disallow: /fonts/ Disallow: /vendors/ Disallow: /fancybox/ Sitemap: https://xuexiaoao.github.io/sitemap.xml