偶然看到<<我也来打造一个个人阅读追踪系统>>,觉得这个想法非常不错。于是利用工作外的时间,经过半个月的折腾,初步搭成了一个自动化的个人阅读追踪系统。在这个系统搭成后,才发现 Read it Later = Read Never 离自己好近。
工具
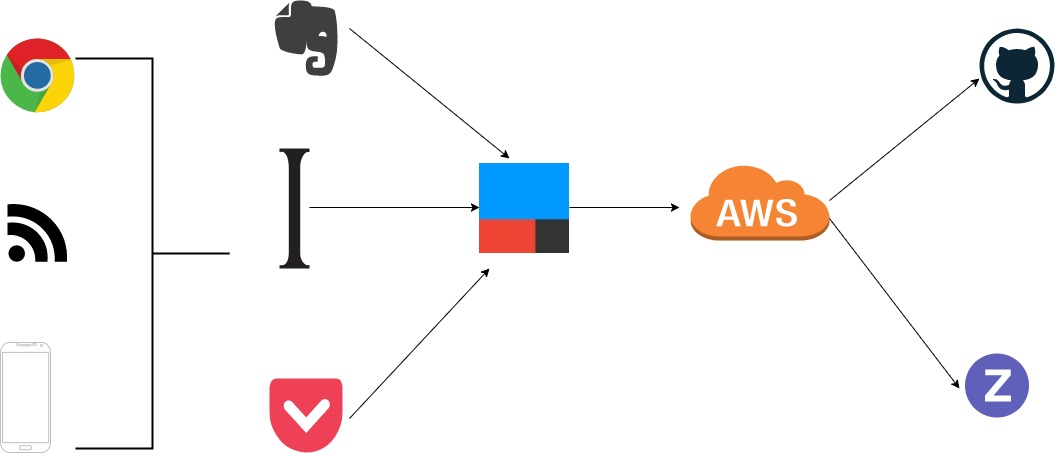
包括但不仅仅局限于下面的工具,这里我使用Instapaper作为稍后阅读的工具,IFTTT作为连接Instapaper和Cloud的中枢,而WebTask作为我的云端处理工具,负责真正请求各类 API。
工作流程
在工作和生活中,我们经常会把文章保存到各种渠道中,比如印象笔记、Instapaper、Pocket 等等,而这时,文章分散到各处,不利于我们了解和统计自己的阅读情况。这时是否可以在文章存档到各处后,自动在 GItHub 中创建一个 Issues,而日后对文章的评论和圈点也会体现在 Issues 中,而且还有一个可视化的工具,详尽的展示了这一段时间内你的阅读情况,从而可以达到展示和督促的作用。
初始化 WebTask
webTask 作为Serverless架构的服务提供者,可以很方便的让我们在云端执行各类任务,在本文中,它的主要作用就是请求 GitHub 的 API,以实现各类功能,比如给某个 Issues 添加评论、关闭某个 Issues…
安装命令行工具
1
2
| npm install -g wt-cli
wt init <YOUR-EMAIL>
|
创建项目
新建一个 node 工程并添加 index.js 文件,补充如下代码:
1
2
3
4
5
6
7
8
9
10
11
| const Express = require('express')
const Webtask = require('webtask-tools')
const bodyParser = require('body-parser')
const app = Express()
app.use(bodyParser.urlencoded({ extended: false }))
app.use(bodyParser.json())
require('./routes/reading')(app)
module.exports = Webtask.fromExpress(app)
|
创建/routes/reading.js 文件,这里以在仓库创建 Issues 为例,完整代码可参考xuexiaoao/demo.serverless-mern
1
2
3
4
5
6
7
8
9
10
11
12
13
14
15
16
17
18
19
20
21
22
23
24
25
26
27
28
29
30
31
32
33
34
35
36
37
38
39
40
41
42
43
44
45
46
47
| require('es6-promise').polyfill()
require('isomorphic-fetch')
const REPO_OWNER = 'xuexiaoao'
const REPO_NAME = 'reading'
const REPO_ID = 107835589
module.exports = (app) => {
app.post('/reading', (req, res) => {
const { GITHUB_ACCESS_TOKEN, ZENHUB_ACCESS_TOKEN, ZENHUB_ACCESS_TOKEN_V4 } = req.webtaskContext.secrets
const { action, issue } = JSON.parse(req.body.payload)
const { url, html_url, number } = issue
console.info(`[BEGIN] issue updated with action: ${action}`)
if (action === 'opened') {
fetch(`${url}?access_token=${GITHUB_ACCESS_TOKEN}`, {
method: 'PATCH',
headers: { 'Content-Type': 'application/json' },
body: JSON.stringify({ milestone: 1, }),
}).then(
() => console.info(`[END] set milestone successful! ${html_url}`),
(e) => res.json(e),
)
} else if (action === 'milestoned') {
fetch(`https://api.zenhub.io/p1/repositories/${REPO_ID}/issues/${number}/estimate?access_token=${ZENHUB_ACCESS_TOKEN}`, {
method: 'PUT',
headers: { 'Content-Type': 'application/json' },
body: JSON.stringify({ estimate: 1 }),
}).then(
() => console.info(`[END] Set estimate successful! ${html_url}`),
(e) => console.error(`[END] Failed to set estimate! ${html_url}`, e),
)
fetch(`https://api.zenhub.io/v4/reports/release/59ec29a2bedf0a4d94322b26/items/issues?access_token=${ZENHUB_ACCESS_TOKEN_V4}`, {
method: 'POST',
headers: { 'Content-Type': 'application/x-www-form-urlencoded' },
body: `add_issues%5B0%5D%5Bissue_number%5D=${number}&add_issues%5B0%5D%5Brepo_id%5D=${REPO_ID}`,
}).then(
() => console.info(`[END] set release successful! ${html_url}`),
(e) => console.error(`[END] Failed to set release! ${html_url}`, e),
)
}
res.json({ message: 'issue updated!' })
},
)
}
|
这里有几个地方需要注意:
- REPO_OWNER:这是你的 github 名字
- REPO_NAME:这是你的仓库名称,之后所有的 Issues 都会创建到这里
- REPO_ID:这个 id 可以通过 github api 获得:https://api.github.com/users/${REPO_OWNER}
- GITHUB_ACCESS_TOKEN:这个没什么好说的就是在 github 上新建一个 Personal access tokens
- ZENHUB_ACCESS_TOKEN:这个是在 zenhub 新建一个 token
- ZENHUB_ACCESS_TOKEN_V4:这个官方 api 没有说明,但是可以打开 zenhub 对应仓库的浏览器开发者工具,任意找一个是 api.zenhub.io 的请求,在 Request Headers 中找到 x-authentication-token 对应的值就是这个 token 了
上传到 webtask
这里需要使用上面准备的 token,然后执行命令即可。由于使用 webtask 的上下文绑定工具webtask-tools,它会对一些敏感信息,比如我们的 token 进行加密,所以不必担心 token 泄漏的问题。
1
| wt create index --bundle --secret GITHUB_ACCESS_TOKEN=$GITHUB_ACCESS_TOKEN --secret ZENHUB_ACCESS_TOKEN=$ZENHUB_ACCESS_TOKEN --secret ZENHUB_ACCESS_TOKEN_V4=$ZENHUB_ACCESS_TOKEN_V4
|
使用 IFTTT 自动化处理
那如何保证一有文章存入Instapaper中,就会新建一个 Issues 呢,这里就需要 IFTTT 这个神器了,这里不对 IFTTT 做详细介绍,如果有机会,可以另开一篇文章,专门介绍 IFTTT。
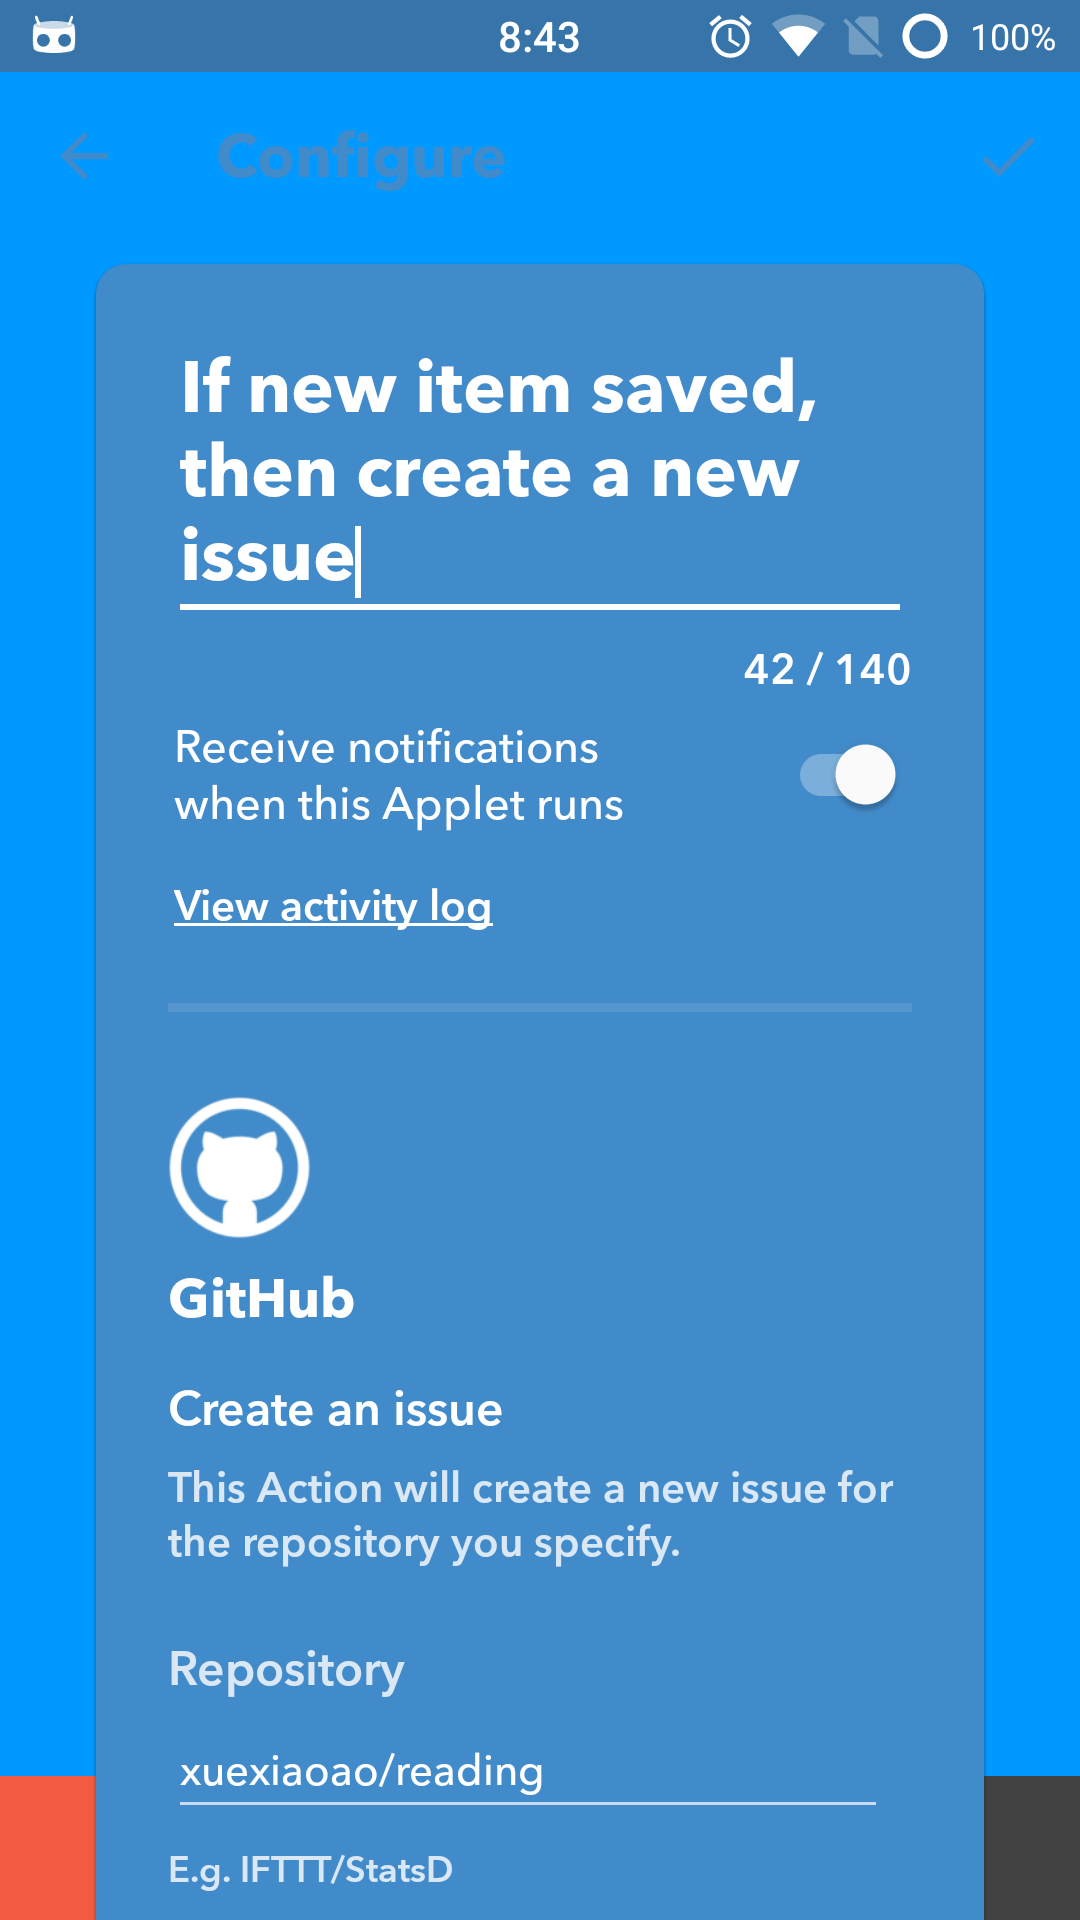
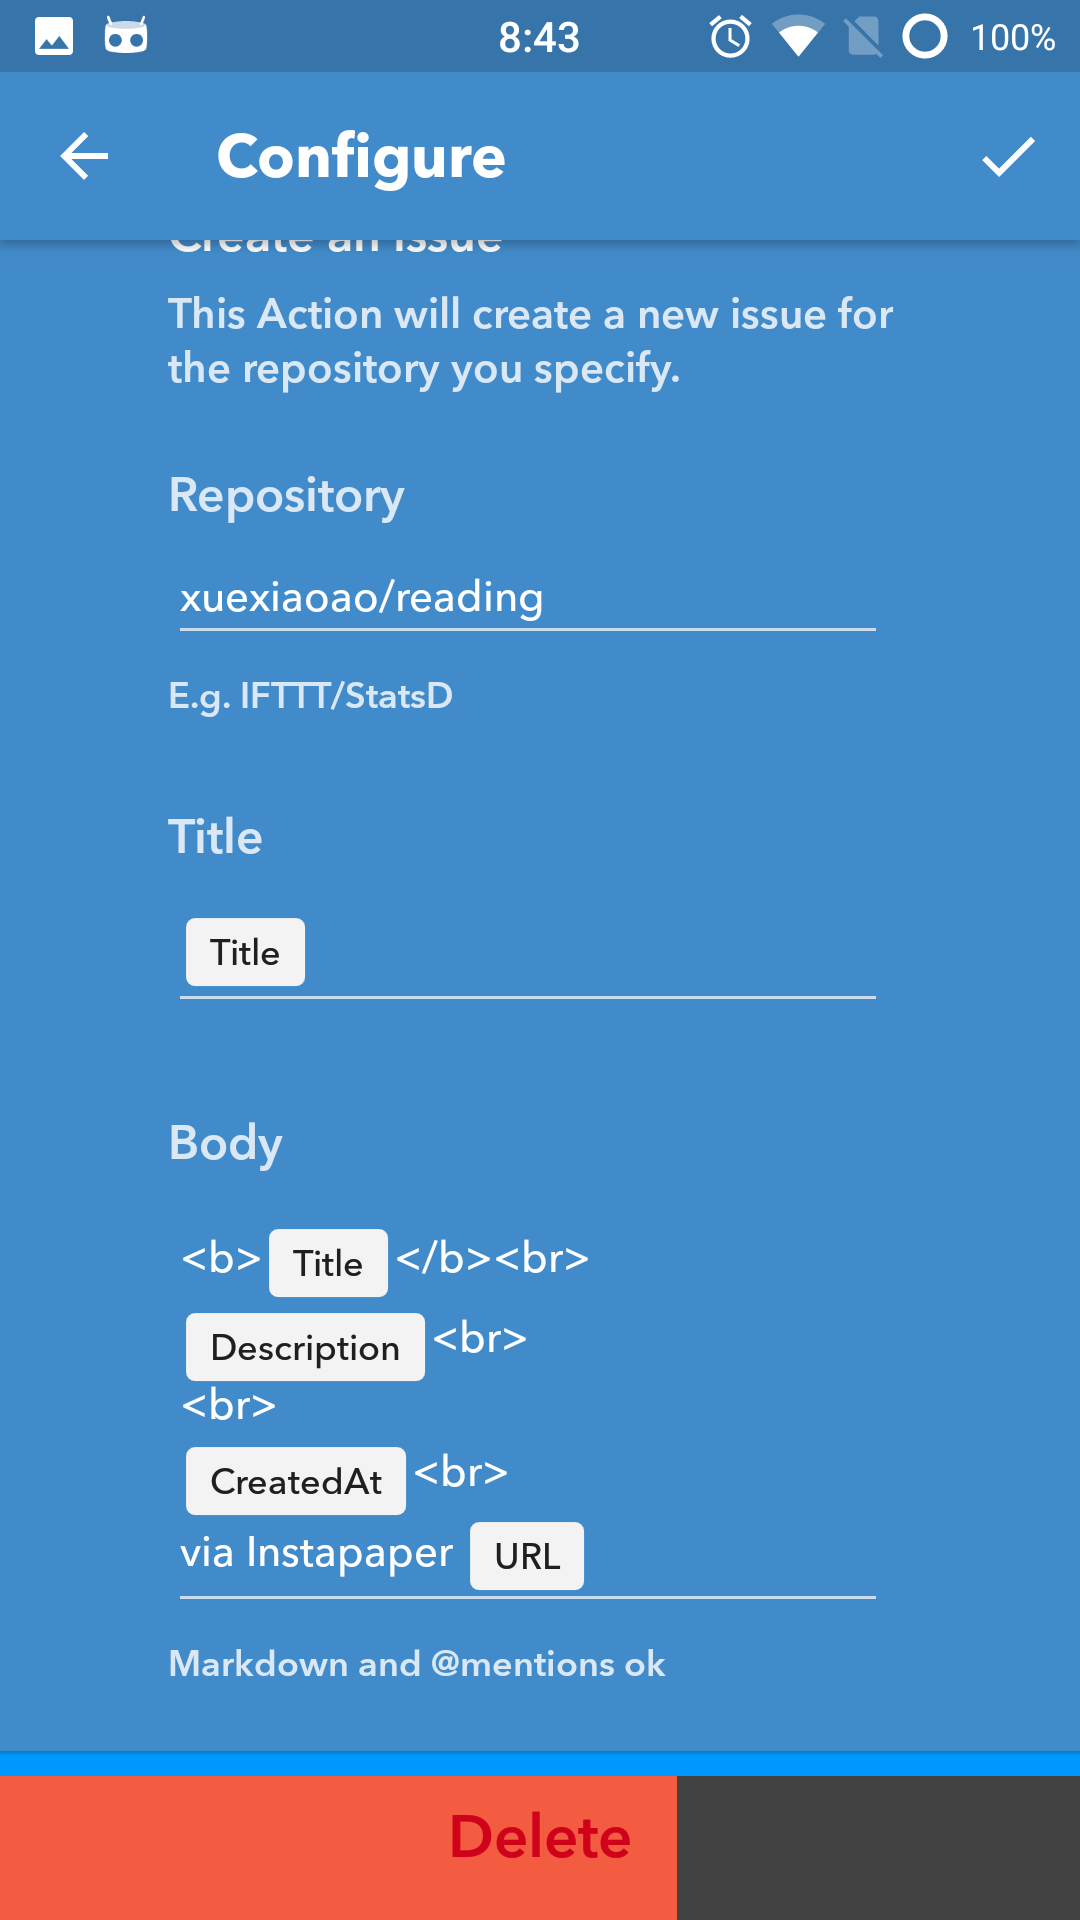
得益于 IFTTT 非常丰富的第三方服务,IFTTT 可以直接创建 Instapaper 与 GitHub Issue 相集成的 Applet:If new item saved, then create a new issue - IFTTT,就可以在当 Instapaper 新增文章的时候,自动在 GitHub 所指定的仓库 xuexiaoao/reading 中创建一个新的 Issue 并添加相应的标题、链接以及描述等相关信息
这里给出把文章保存到 Instapaper 后,自动在仓库创建 Issues 的例子,其他的操作都可以类似处理,如果有疑问,可以在本文留言。
集成 ZenHub
现在仅仅会自动新建 Issues,而我们还需要把 Issues 添加到 Milestone 中,就可以利用 Zenhub 的图表功能,可视化的查看和分析你的阅读情况。
Github 提供 WebHock 功能,方便的让我们监控仓库的各类事件,从而触发某个自定义的功能,而这些功能我们已经放到了 WebTask 上面了。
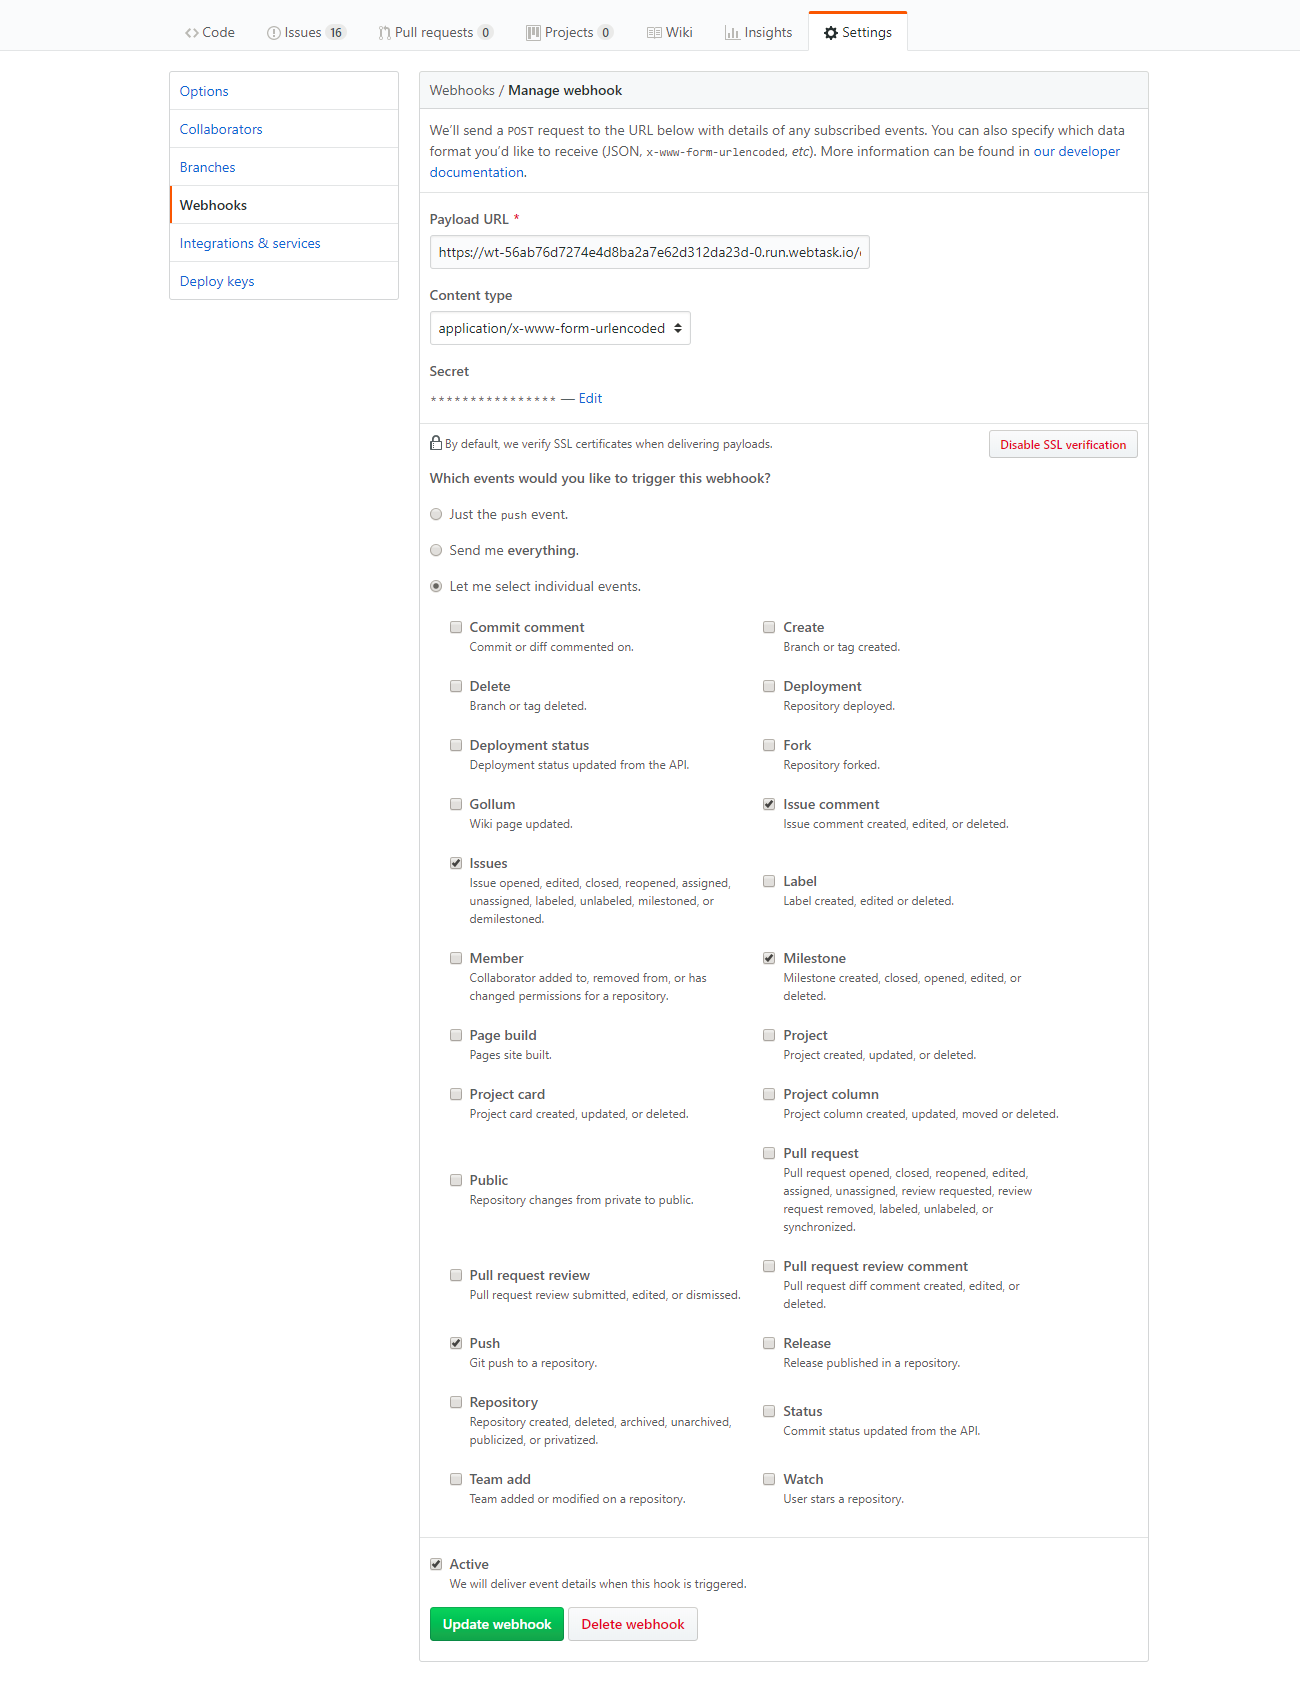
这里你需要改的就是Payload URL,它是你在执行上传到 webtask后得到的一个 URL,其余的可以参考上图。
其他功能示例
在 Instapaper 做笔记
1
2
3
4
5
6
7
8
9
10
11
12
13
14
15
16
17
18
19
20
21
22
23
24
25
26
27
28
29
30
| app.post('/reading-note', (req, res) => {
const { GITHUB_ACCESS_TOKEN } = req.webtaskContext.secrets
const title = req.query.title
const note = req.body.note
const highlightedText = req.body.highlightedText
console.info('[BEGIN]', { title, note, highlightedText })
let keyword = encodeURIComponent(title.replace(/\s/g, '+'))
console.info('[KEYWORD]', keyword)
fetch(`https://api.github.com/search/issues?q=${keyword}%20repo:xuexiaoao/reading%20is:open`)
.then(response => response.json())
.then(data => {
console.info('[RESULT]', data)
if (data.total_count > 0) {
data.items.forEach(({ url, html_url }) =>
fetch(`${url}/comments?access_token=${GITHUB_ACCESS_TOKEN}`, {
method: 'POST',
headers: { 'Content-Type': 'application/json' },
body: JSON.stringify({ body: `> ${highlightedText} <br/><br/> > ${note}` }),
})
.then(() => console.info(`[END] added comment successful! ${html_url}`))
.catch(err => res.json('error', { error: err })))
res.json({ message: 'Added comment into issue successful!' })
}
res.json({ error: 'Not Found!' })
})
.catch(err => res.json('error', { error: err }))
})
|
Instapaper 归档文章
1
2
3
4
5
6
7
8
9
10
11
12
13
14
15
16
17
18
19
20
21
22
23
24
25
26
27
28
29
30
31
32
33
34
35
36
37
38
39
40
41
42
43
44
45
46
47
48
| app.get('/reading', (req, res) => {
const { GITHUB_ACCESS_TOKEN } = req.webtaskContext.secrets
console.info('[BEGIN]', req.query)
const title = req.query.title
let keyword = encodeURIComponent(title.replace(/\s/g, '+'))
console.info('[KEYWORD]', keyword)
fetch(`https://api.github.com/search/issues?q=${keyword}%20repo:xuexiaoao/reading`)
.then(response => response.json())
.then(data => {
console.info('[RESULT]', data)
if (data.total_count > 0) {
data.items.forEach(({ url, html_url }) =>
fetch(`${url}?access_token=${GITHUB_ACCESS_TOKEN}`, {
method: 'PATCH',
headers: { 'Content-Type': 'application/json' },
body: JSON.stringify({ state: 'closed' }),
})
.then(() => console.info(`[END] issue closed successful! ${html_url}`))
.catch(err => res.json('error', { error: err })))
res.json({ message: 'Closed issue successful!' })
} else {
console.info('[RESULT]', data)
fetch(`https://api.github.com/repos/${REPO_OWNER}/${REPO_NAME}/issues?access_token=${GITHUB_ACCESS_TOKEN}`, {
method: 'POST',
headers: { 'Content-Type': 'application/json' },
body: JSON.stringify({ title }),
})
.then(response => response.json())
.then(({ url, html_url }) => {
console.info(`[END] issue created successful! ${html_url}`)
fetch(`${url}?access_token=${GITHUB_ACCESS_TOKEN}`, {
method: 'PATCH',
headers: { 'Content-Type': 'application/json' },
body: JSON.stringify({ state: 'closed' }),
})
.then(() => console.info(`[END] issue closed successful! ${html_url}`))
.catch(err => res.json('error', { error: err }))
})
.catch(err => res.json('error', { error: err }))
}
res.json({ error: 'Finished achieve reading item!' })
})
.catch(err => res.json('error', { error: err }))
})
|
总结
至此,一个自动化的阅读追踪系统已经搭建完成,现在我们就可以查看每天乃至每周的阅读情况了,你只需要定期的查看阅读效果,就可以对自己的阅读计划进行调整和变更。
当然还有一些问题需要处理,比如对文章进行分类以使这套系统更有参考性,是否需要把在 Instapaper 中的笔记保存到自己的知识库中。
参考资料